Friday, December 16, 2016

December 2016 Soap Challenge "Tiger Stripe Soap"


This month's Soap Challenge offered by Amy Worden of Great Cakes Soapworks is "Tiger Stripe". 
Here are the Guidelines for this month's challenge:

1. Definition of Experienced Soapmaker: You have been making soap for at least 2 years OR you have made more than 50 batches. A newbie MAY enter the experienced category if he/she wishes.
2. Your soap is made with cold process only, featuring Tiger Stripe techniques in the majority of your soap, using a log mold. You poured your soap in lines from one end of the mold to the other. You may have manipulated the soap after the pours were made, but it is still apparent that there are stripes throughout the soap.
3. Your soap has at least 2 different colors.
4. Your soap has been cut normally, in vertical slices.
5. The photo you are submitting has soap(s) from ONE batch only, with the only editing being for lighting and color adjustments to best represent what the soap looks like in real life.

 
I have wanted to make a tiger stripe soap and incorporate a bright pink color into the mix  of colors for a long time, so this was the perfect time to give it a try. For my colors I chose  "Activated Charcoal" for the black, and "Titanium Dioxide" for the white (both from Bramble Berry), and I used a pink called "Day Glo Pink" .  The soap is scented with "Pink Berry Mimosa" fragrance oil from Wholesale Supple Plus. I used a wavy divider that I had purchased quite a while back and wanted  to see how it would affect the  different colors I chose for each side of the mold, both sides will have the  tiger stripe. When cut the only difference that showed was that each side had different widths of the colored sections and the other side of the bar had just the opposite widths of colors than the other side. I think this wavy divider would actually be better suited for a horizontal cut of each soap bar (my next experiment), but since the challenge rules were to cut the bars vertical that is what I did.  I still like how they turned out and enjoyed experimenting.

 I love doing all the soap challenges and learning all the different techniques that I normally would not know how to do, or to do them differently. Thank you Amy Worden for sharing with all of us some pretty awesome ways to make soap.
 
Thanks for stopping by my blog and I would like to share some pictures of how I went about making this soap for the challenge.
 

Here are my colors and the added
wavy divider inserted.


Well here I go adding the colors, I really need to
get my lines a lot straighter! It looks like a real
curvy road.

 
Getting better with my lines being straight.
The mold is filled half way in this picture.


All done and swirled the top of the soap loaf.
I sure like this shade of pink.
 
A close up of the top of the soap in the mold.


Here you can see how the wavy divider made
the different widths of each side going down the mold.


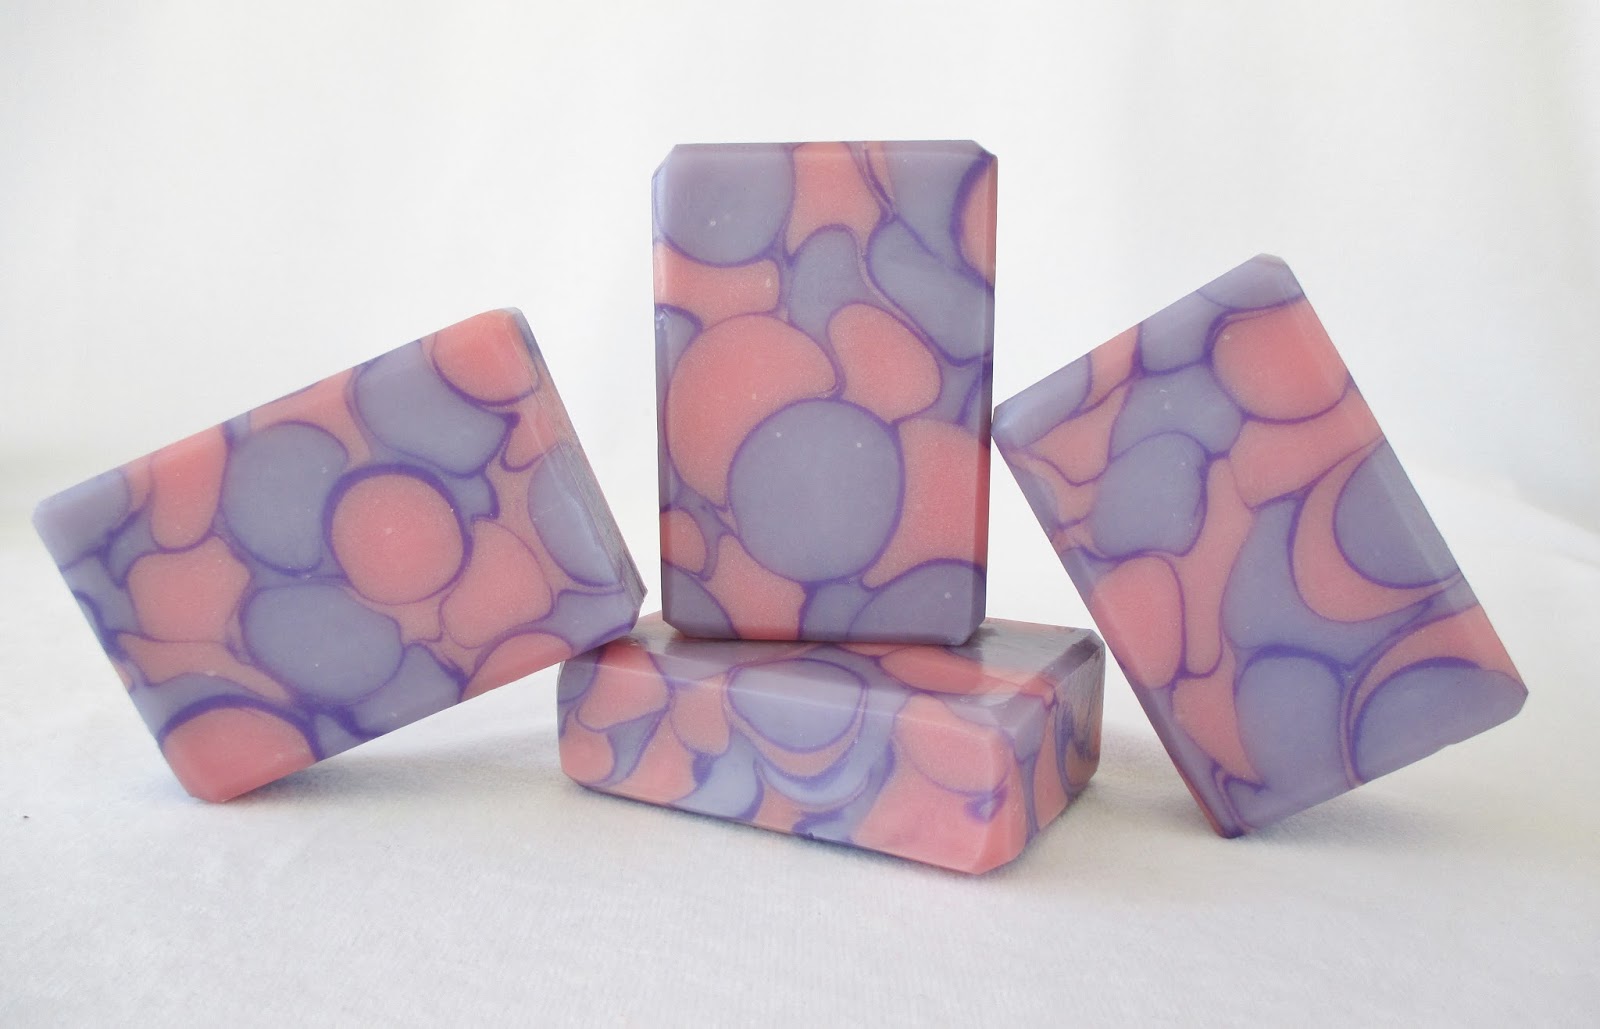
And here we have the soap I am entering for the Tiger Stripe Challenge.
I am calling it "Pink meets Wild".


Saturday, October 15, 2016

October Soap Challenge "Wood Grain Soap"


This month's Soap Challenge offered by Amy Worden of Great Cakes Soapworks is "Wood Grain  Soaps".  Here are the guidelines for this month's challenge:

The goal of this challenge is to get our soap to look like a natural wood grain.  The textures, colors, and feel of a piece of wood can vary from tree to tree, and the look of the wood will also change depending on the finishes and stains, or paint that is used on it.
Here are the Guidelines:
1. Your soap must be made with cold process only featuring a wood grain technique. (The outer bark of the tree may also be part of your design, but the main focus should be the inside grain.)

2. You may use any type of mold, size, or shape for your soap.

3. You may submit your entry in ONE of the two categories: all-natural or synthetic. In order to enter your soap in the all-natural category, it must not contain any synthetic ingredients. No fragrance oils, micas, pigments, oxides (including zinc oxide and titanium dioxide) or dyes. A list of ingredients as you would list them on the label will be required for all entries in the all-natural category. These may be listed in the caption or blog post that you link to, not on the entry itself.

4. The photo you submit should have cut soap(s) from ONE batch only. Lighting and color adjustments may be made to best represent what the soap looks like in real life, but editing photos to alter the appearance of the soap is strictly prohibited.

 
I thought this challenge would be a breeze to complete, boy was I wrong. I decided I would like to make a soap that looked like weathered wood and started searching for images on Google for pictures and found some good examples and decided on these two images as my inspiration.


 I wanted to do a spin swirl to try and mimic the wood texture. The colors I chose are a grey mica, titanium dioxide for the  white, and a teal mica. I mixed 2 different fragrances from Bramble Berry, Woodland Elves and  Vetyver.  After getting my soap to a very light trace, I mixed my colors and put them into the bottles, I mixed a light grey and a darker gray and wanted just a small amount of the white and teal for part of the design. Everything went really well at first, the soap stayed very fluid for the pour, but when I actually started turning the mold back and forth to get the wood texture look a bunch of soap spilled out over the top of the mold, what a mess that was. Well I got that cleaned up and then I pressed a wood grain texture mat onto the top of the soap in the mold. Well there was a bunch of air bubbles under the mat and no matter what I tried I could not get most of them smoothed out. When I unmolded the soap the air holes looked awful so when the soap was hard enough to handle I used my soap beveller and shaved off  the top of the soap, I love how it showed the wood type texture when I shaved away the air bubble marks.
 
 
Staring to pour the different colors.


Finishing up the pouring of the colors.


Getting ready to spin the soap in the mold.


Cut Soap Bars


Cut Soap Bars


Cut Soap Bars


Take a peak at Amy's web page HERE

Saturday, September 17, 2016

September Soap Challenge "Piping Soap"


This month's Soap Challenge offered by Amy Worden of Great Cakes Soapworks is "Piping Soaps".  Here are the guidelines for this month's challenge:

1. Your soap is made with cold process only.
2. You MUST have at least one component of your piped soap that has more than one color in one bag.
3. The only embellishment allowed is glitter.

I wanted to use the "Russian Piping Tips" that I had ordered a few months previously so the timing for this challenge was perfect. I went on YouTube and  watched several video's of using the tips on real cupcakes (not soap cupcakes) and fell in love with the "Russian Ball Tips" so I ordered a set of those also from Amazon. I thought they would come relatively soon but as  the days kept ticking by and they did not arrive in the mail I was getting a bit nervous that I would not get the time needed to do the challenge and get pictures taken. Well they finally arrived on Sept. 14th so I started my project on Thursday, September 15th with fingers crossed that all would go well with the process, no time to give it a second go if they did not turn out.

The hard part is waiting for the soap batter for the piping to get hard enough to pipe onto the tops of the cupcakes and hold its shape without collapsing. I separated my batter for  2 different projects, one for some square bars of soap using the Rosebud Russian Tip, and then the cupcakes using the Ball Russian Tip that I had ordered on Amazon. On the rosebud tip my frosting was not set up enough and the petals did not stand up enough. I have never made leaves before and I definitely need a lot more practice on them. I waited until I finished with the cupcakes to pipe the leaves and by then the soap had set up quite a bit and did not flow out of the tip very well.

I wanted to make a rainbow frosting for the cupcakes and love how they turned out using the ball tip. As you are piping the frosting with this tip you are twisting your wrist back and forth and it creates the pretty ribbon look. When you lift off the tip it leaves the top with a hole and I used  the open star tip to fill that in, boy was it messy getting the soap out of the bag and into another bag even though I rolled up the original frosting soap in saran wrap. On the frosting YouTube video's I watched they made it look so easy, next time I will make a separate bag just for that part of the process and have it ready.  I have chosen to enter my rainbow cupcake soaps for the challenge, but will also post some pictures of my rosebud soap attempt.

 I learned so much from this challenge and fell in love with the Russian Tips. I want to practice more with them and thought maybe I should just make some frosting cupcakes for practicing with and could  give them to the grandkids to enjoy.  Thank you Amy and can't wait to see what the next challenges will be.
 
 
Rainbow colors all mixed.


Added colors onto the saran wrap, not to roll it
and put into the piping bag. 


Here are the cupcakes and the tips I used for the frosting.


Here are pictures of the Rosebud Soaps.


Tips used: Russian Rosebud & Leaf.


Sunday, August 7, 2016

My adventures making the "Dancing Funnel" Soap Challenge.


This month's Soap Challenge offered by Amy Worden of Great Cakes Soapworks is called the  "Dancing Funnel".  This technique was introduced by Tatsiana Serko of Creative Soap by Steso.  She is so talented and I never get tired of looking  at all of her awesome creations. I am so grateful that she would share with us just how to make this soap design along with the helpful tips. Also I would like to thank Amy for all her information and the video  tutorial of her making the soap.

This technique requires that you have a very  fluid soap batter and it is recommended that we do not use our stick blender to bring the soap  to a light trace, and instead stir the soap enough to establish an emulsion so the oils and water/lye mixture will not separate.  I was very nervous that I would  not mix it long enough, and was not really sure just how the soap should look to ensure that it would not separate. 
The first batch I made is the one I feel that I was the most successful with. I am happy with the results and will submit for the Challenge. It is scented with Lavender fragrance oil from Bramble Berry. The color I used for the rim is a dark purple mica, the other two colors were a pink and a lavender mica (used the same purple as the rim and added some white mica to lighten it). 

 
My color choices.
 

Starting to add my colors in the mold. 


Almost done with the colors.


The finished soap in the mold.


Here it is unmolded and ready to cut into bars of soap.
I will plane the bars in a few days.


Here are some pictures of the bars of soap after they have been planed.


I tried 3 other soaps batches and had different results making each of them:
 Attempt #2 - I used "Almond" fragrance oil,  I added the fragrance to the oils before adding the lye as I did with batch #1 and started to stir it and within a few minutes the soap started to quickly get really thick. I hurried and separated out some of the soap and colored it white, and colored the rest yellow and globed it into the mold alternating colors and mixed it a bit to make a swirl and stuck it into the warm oven to gel. I did get some nice bars of soap so was happy with that, and they smell really nice.


Almond Scented soap bars.


Attempt #3 -  I used "Energy" fragrance oil. The colors I chose for this one was a red for the outer ring, black for one center color, and red for the other center color. At first everything was going great as I was making all the different colored centers,  then the colors seemed to be taking on a shape of their own, and that is when I noticed that the soap oils seemed to be seeping to the top of the soap and the colors were traveling away from the design. I decided to just add the rest of the colors try swirling the top layer that had seeped the oil and put it into the warm oven and see what happens. The oils did absorb back into the soap batter as it gelled....whew. I went ahead and planed the bottom part of the soaps just to see what the dancing funnel colors looked  like, and I could see that the colors were actually traveling away from the design. Looks like we have us some soap to use for our family, and it really smells awesome.


Color choices for the Energy Soap


Here is the beginning of adding the colors into the mold.


Here I gave up on trying to continue the rest of the dancing funnel pour 
and adding the rest of the soap colors to swirl.


Here is the swirled top ready to go into the warm oven 
to gel the soap.


On the left is the soap that I planed to see what the colors looked like,
and the right side picture is the other side of the soap where I swirled the top.


Attempt #4 - I used "Pearberry" fragrance oil. The colors I chose for this one was a Teal for the outer ring, White, Yellow and Orange for the different center colors. This time the soap stayed together for the entire pour and I decided to see how it would turn out if I did not gel the soap. I was a softer soap than the ones that I gelled and I had to wait longer to plane the tops but other than that all went well.  I am pleased how it turned out, the colors remind me of candy corn (except for the teal)......now that has me thinking of a possible soap to make if a vendor has that fragrance oil.


My color selection, for the white I use a mica instead of Titanium Dioxide.


Here is the soap just after finishing the pour.


Here are the cut & planed bars of the Pearberry soap.