Saturday, July 28, 2012

My search for a perfect Watermelon

I have been wanting to make a "Watermelon Soap" for a long time. You would think that it not be too hard to do. Well for starters I will need to find the perfect watermelon color, sounds like it would be pretty simple doesn't it. I have found that to get a good red is really hard to accomplish in a cold process soap. First you start out with a white to cream colored soap base, and when adding a red colorant to that you get pink, add more red you get a darker pink. Getting the perfect watermelon color will be my biggest challenge. I have seen pictures of soaps that  have a really nice red in their cold process soaps, I really envy the soapmaker for knowing the secret to getting that red. I don't feel that watermelon is a really bright red, to me that it has more of a reddish/coral coloring to it.
I ordered several different red colorants and got busy mixing up the colors for my test batch of soaps. This is what I mixed for my test:

Lake Dye #7
Lake Dye #22
Lake Dye #40
Bordeaux Mica
Queen Kathryn Mica
Ruby Rose Mica
Non-Bleeding Liquid Red
Valentine Red Liquid Colorant


Now I would like to show you some pictures of some of the testing process and my finished soaps.


Here are some of the test colors mixed up. I brushed some of
the colors onto the paper towel to see what they looked like.


Here are the test soaps with all 8 test colors.


Here they are out of the molds, you can see some slight
color changes in some of them. I have arrows pointing to
the soaps and what color I used.


I just could not help myself, I had to go pruchase a watermelon to be sure
of the color. And yes it was a good tasting watermelon! Here you can
see the comparison on the top row between the Red #40 & Red #7. The
other colors did not even come close to being correct.


Now for the bottom row. The only color I felt come close is
the Valentine Red liquid color.


This one is looking real close to the right color.
 I wonder if it might fade lighter as the soap cures?


One more comparison before I decide. I think the
#40 might be too light and the #7 looks more like a
tomato red. 


OK, I have now decided how I am going to color my soap, and of course
you need to have seeds for the watermelon. Now on to making my soap.


And here they are out of the mold and cut. They are scented
with at watermelon fragrance oil and boy do they smell good!
They will be available for sale the middle of August, 2012.


I just love how they turned out, and they were very fun to make.


I am wondering what color you would have choosen from the test bar pictures.

Hint: I used 2 of the color choices for these bars.


Saturday, July 14, 2012

Soap Challenge Soap Swap

I was sorry to have the "Soap Challenge" come to an end. I had a lot of fun trying new methods of soap making, but I think my favorite part was getting to see everyone else's soaps and read about their soap making adventure.

At the end of the challenge Amy offered us a 'Soap Swap" with the other participants, we just had to let her know if we were interested. Boy I jumped on that right away. How fun would that be! For the swap Amy teamed us up with another soap maker that had also signed up and we were to send one or two bars of soap that we made to each other.
I would like to share the soaps that I received from Lisa of Willow Moon Botanical Bodycare. They all smell so good and I cannot wait to try them all. I received a bar of her "Cocoa Mint Bliss" which was from her in the pot swirl challenge, along with one of her popular bars from her regular soap line "Comfrey, Oats & Aloe". As a special treat I also received some sample bars of soaps, "Earth Dance", Lemongrass & Ginger", "Rosemary Nettle" shampoo bar, Lavender & Tea Tree, and Apple Harvest". 

I want to thank Amy for all her hard work she put into this series of soap challenges for all of us to enjoy, learn more skills, and to connect us with other talented soap makers. I also would like to thank Lisa as my "Soap Challenge Swap Partner". This has been a fun adventure for me, if you were to ask me if I would do this again my answer would be "In a heartbeat, YES". If you ever get the chance to participate in something like this I would encourage you to jump at the chance, you will not regret it!
Amy makes some beautiful soaps, you can keep up with her creations on her blog and be sure to go to her web site and see what she has available at:  Great Cakes Soapworks 


Saturday, June 2, 2012

Week 11 of the weekly "Soap Challenge".

This week's soap challenge was to make an "All Natural Soap". So what exactly does that mean, no synthetic fragrances or colors can be added. You could use plant-based essential oils for scent or no scent added at all. I looked to see what I had on hand that I could use and decided on a calendula soap using a peppermint and spearmint essential oil blend for the fragrance. The first step in making this soap was to infuse the calendula in olive oil. To speed up the infusing process I used a crock pot (dedicated to soap making only) and added the calendula and olive oil and heated it on a low temperature for about 4 hours. I then strained the mixture using a coffee filter to remove the calendula petals. I used 1/2 aloe vera juice and 1/2 water to mix with my lye . After making the soap base and mixing in the EO I divided out some of the soap base into 2 measuring cups for the top and set aside.  With the remainder of the soap I added some dried calendula and mixed it with the stick blender and poured that into the soap mold.

Now for the top of the soap, I decided I wanted to use paprika as my natural colorant. In one of the measuring cups I added 1/2 tsp. of the paprika to the soap base and mixed, I wanted it darker so I kept adding 1/2 tsp. at a time until I liked the color. I ended up using a total of 1 1/2 tsp. I was afraid if I used too much it would be too scratchy.  I wanted a nice red color to go along with the peppermint EO but when I put the color on the top it reminded me more a tomato soup color. With the other measuring cup I left it the natural soap color and I will use this as a color to put on top of the paprika color and swirl.  I am happy how the color did turned darker after the soap went through the gel phase The next time I try paprika as a natural colorant I think I will go ahead and add more to the soap and see what happens and what color I get.

This is the last soap challenge for now. I am not sure if Amy will be offering more challenges after her busy summer season, if she does I will be very excited to participate in doing more.  Amy I would like to thank you for all your hard work putting this challenge together for us and I cannot even begin to tell you how much I have learned and how grateful I am that you would share your awesome skills with us.

Please to go to Great Cakes Soapworks  and see Amy's beautiful soaps.

Also go to this link for and take a look at all the other great soaps that other soap artists have made for this weeks challenge : http://networkedblogs.com/yiMOw  

Here are some of the pictures of the process and the finished soap.


Oils ready for the lye, essential oils, calendula, and paprika
all ready to go.


Soap base seperated for the top. Adding in the calendula
for the main part of the soap.


Starting to mix in the paprika for the top soap color.


Here is the top colored with the paprika.
Looks more orange than red.


I added the uncolored soap base to the colored base
 and swirled it in.


Here it is just out of the soap mold. I like the color
much better after the soap went through the gel phase.


Cut Bars. I love the look of the calendula in the bottom layer.


Calendula  Mint  Soap

Saturday, May 26, 2012

Week 10 of the weekly "Soap Challenge".

This week's soap challenge was to make a "Landscape Soap". The first challenge for me in even doing this soap was to think of a landscape that I thought I would be capable of doing. I have been thinking about it for a couple of weeks as I knew I would need to do my embeds for this soap ahead of time, so I decided  to do a sunrise scene. I wanted the soap to look like a slice of the earth (like you see in gardening books showing your planting layers). The week before I made extra soap base so I could create the sun ahead of time.
For my colors I used a brown mica for the ground, green oxide for the grass, for the sky I used ultra marine blue and added a blue mica, for the clouds I added a white mica to the natural soap base. I scented the soap using a "Eucalyptus & Spearmint" fragrance oil. I was not sure how this fragrance would behave so I added some to each layer as I did them, instead of to the whole batch. When I sliced the soap on my cutter it was a bit hard to get through the sun part in the soap since it was made the week before and was quite a bit harder, but it did cut it without breaking the cutting wire.

This was a fun challenge and I would like to try this again and hopefully my imagination can come up with something with a lot more detail.
I will share some of the pictures of the process and the finished soap. I hope you will all go to Great Cakes Soapworks  and take a look at all the other great soaps made for this challenge.

Next week's challenge: Making soaps using natural ingredients.

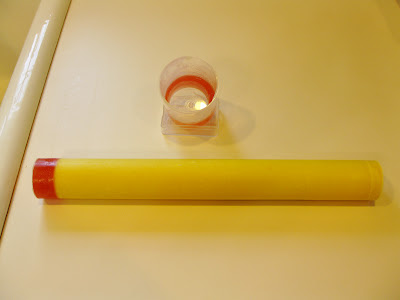
Here is the tube I used to make the sun. I tried something new to plug the bottome of the pipe, I poured some heated melt & pour soap base in the small plastic container and while it was still melted I put the pipe in and let the soap base cool before I added my cp soap base. It worked really well and I did not have to worry about the bottom leaking, plus when I pushed my soap out of the tube I was pushing against the melt & our base and not the actual soap embed. 


Here is the sun out of the pipe mold. Now I will cut off the
melt & pour soap plug and it will be ready to embed into my soap.


The brown first layer poured.
Mixing the green next layer. 


Green layer added. I am making peaks on this layer hoping that it will look like grass standing upright. It did not look that tall after pouring on the sky color, I think I should have let it set up longer.


The blue is poured, added the sun and more clouds.


I added the remainder white soap base and swirled
the top to make it look like fluffy clouds. 


Here is the soap out of the mold. I lined my mold using
plastic and I don't like the wrinkles it created on the sides.
Note to self: take the time to line it with the normal
butcher paper. A silicone mold insert would be nice  :)


Soap bars cut.


I took the end cuts from the soap loaf and
made soap balls again to use as embeds.
I think they look like little world globes, what do you think?


Introducing "Rise n' Shine"

Todays Forecast - Sunny, Partially Cloudy with a  'Chance of Showers'.

Sunday, May 20, 2012

Week 9 of the weekly "Soap Challenge".


This week's soap challenge was to make a "Peaked Soap". This is not a new technique for me and after watching the video Amy mentioned by Holly of Missouri River Soap, I decided to try Holly's method. The peaks on the video looked interesting and I would be able to attempt something completely different than my usual texture for the top of my soap.
For my swirl colorant I am using a Green Oxide. The fragrance I chose for this soap is "White Gardenia", I love this fragrance but in a previous batch it did trace fast (as a lot of floral scents seem to do when I use them), so I was mentally prepared to move fast if needed to get the soap into the mold. I chose to do the "room temperature" method of soaping. This method is to get all my oils heated and mixed together and my water/lye solution mixed the night before then when I soap the next day they are both at the same temperature (hence room temperature). Well to my surprise the soap behaved really well with the fragrance and I did not have a fast  trace. I was able to achieve a nice swirl, and the peaks worked out great for the top. This soap was so fun to make, besides smelling wonderful!

I will share some of the pictures of the process and the finished soap. I hope you will all go to Great Cakes Soapworks  and take a look at all the other great peaked soaps.

Next week's challenge: Landscape Soap. I have no idea what a "Landscape Soap" is and just the thought of trying to create a landscape soap seems very intimidating. Well I guess we will see what that is all about next week. Hope you come back and see what happens.

Swirl completed and ready for the top.

Starting the first row of the peaked top.


Row two and everything is going well.


Top Completed ~ Yahoo!!


Soap log out of the mold.


Cut Bars. I love how the swirl turned out.
I am hooked on swirled soap.


This shows the top peaks of the soap.


Saturday, May 5, 2012

Week 7 of the weekly "Soap Challenge".


This week's soap challenge is to create a gradient colored soap. This technique is new to me and I am very excited to try my hand at it. The idea is to have your colors start out one color and gradually lighten or darken with each pour. Amy Warden from Great Cakes Soapworks shared a great video showing a good technique to accomplish this, starting with a darker color as the bottom pour and lighten the soap as you pour each layer.

I decided to use burgundy oxide for my base color and gradually lighten it for each additional pour. I fragranced this soap with  "Black Raspberry Vanilla". I love this fragrance and can't resist smelling it every time I go into the curing. I wanted to also try doing a color line between my color layer and my white top layer, for that I used cocoa powder, applied with a tea infuser strainer.

Basically the soaping process went very well, the recipe stayed fluid to get a good pour and the fragrance oil did not accelerate the trace. Did you notice that I said it "Basically" went well.......the first mishap was when I was dusting the cocoa powder on the last colored layer and was almost done when I lost my grip on the tea infuser strainer, and of course it had to plop right into the soap. Well I fixed that the best I could then sprinkled on more cocoa powder. OK, now onto cleaning the cocoa powder dust from the soap mold so there won't be any of the dust getting onto the sides of the white soap base for the top. With a damp paper towel I cleaned around all the edges and it was looking really good, then..... I dropped the paper towel right in the middle of the soap again, gurr. Fixed the soap again and sprinkled more cocoa powder onto the soap. Now for the white top color, that I spooned on gently so it would not mess up the cocoa powder line (after all I tried to mess it up twice and did not want any more mishaps). I am happy to say that went well, I had some pink left over and could not resist adding a swirl to the top (I really love swirls).

To me the burgundy color seemed too dark for the bottom layer and did not show much of a color difference in the next two pours, but then I could really notice the color differences in the remaining pours. I loved doing this technique and already have some other projects planned.

Here are some pictures of the process and the finished soap. Please go to this link: Great Cakes Soapworks. to see all the other beautiful soaps that everyone else has made. Next week's challenge: Salt Bars, please check back.

Mixing the color.


The final color being poured.

Starting to sprinkle on the cocoa powder line.


Left over soap color for the swirl.


The completed swirl...did I mention how much I love swirls?


Soap log out of the mold.


Soap log out of the mold....another view.


Cut bars, made soap balls with the ends for embeds.